Thursday, April 29, 2010

Hair Bow…

*Note: These are NOT the best pictures, or a great tutorial for that matter.

Materials:
Tulle: 3 inches x 29 inches (depending on the size of each petal, it could take less. I think mine ended up being closer to 23/24 inches)
Matching Thread
Some type of embellishment: button, beads, pearls…whatever
Clip
Ribbon (to cover clip)

I started by folding the tulle into thirds before folding it over to make the first petal. Once folded take your needle and thread and make a couple stitches to hold it in place.0062 Repeat the folding/sewing step until you have 5 petals (more or less depending on the look you are going for).0072 0082Add embellishment(s), and attach to clip (covered by ribbon).
0092I also made this adorable bow (sorry no picture) from Make It and Love It. It’s the black tulle one. I think it is so cute, and can’t wait to put it in my little girl’s hair.

Tuesday, April 27, 2010

Charis’s Hope…

My best friend recently lost her sister to a heart condition. Her sweet 8 year old, Hannah decided to make bracelets to raise money to help people with heart problems...all on her own. I told you she was sweet! Please visit her over at Crafty Chic Lyric to read more about her sister’s story, and order your bracelet. We received our first bracelet of many this afternoon, along with a handmade card from Hannah herself. We will be wearing ours proud in honor of Charis.
0122
0132

*Note: Leave a comment with what you would like to order. She is still working on setting up the whole PayPal thing.

Wednesday, April 21, 2010

Nursing Cover...

I bought this fun fabric to make a car seat tent, but was quickly told by my Mom that I couldn't make it (she was already making me one). So I had two yards of fabric, and didn't know what to do with it. After some time, I decided to make a new nursing cover. I followed Sew Much Ado's tutorial (with a few changes of my own).


Materials:
1 rectangle 28 inches x 40 inches (main body)
1 rectangle 3 1/4 inches x 10 inches (strap that attaches to D rings)
1 rectangle 3 1/4 inches x 26 inches (strap)
16 inch boning
2 1 inch D rings
2 4 inch triangular pieces for the pockets
*Note, you can use coordinating fabric for the straps/pockets if you'd like, but you don't have too.
Fold in half and sew along the open edge 1/4 inch in.
I decided to use a coordinating fabric for the straps.
Take the shorter piece and slip it through the D rings. Fold in half, and sew as close to the D rings as possible. (I sewed a 1/4 inch around the outside of the strip to keep it from moving much).
On the long piece, leave one end open and sew a curve to close it off. Cut off the excess fabric after you've sewn it. This creates a nice point when you turn it inside out. For a better picture check out Sew Much Ado's site.
At this point, I took my large rectangle (forgot to take a picture of this), and hemmed the edges by folding the sides and bottom edge 1/4 inch, ironing and folding it over 1/4 inch again. I didn't the edges until the very end.
*Note: At this point, I only folded the top over once because you add the boning before folding over again (directions below).
I wanted to add some pockets to the bottom corners of the cover for binky's or whatever else I wanted to put in there. My triangle ended up being 4 inches from point to the flat edge bottom.
I hemmed the flat part of the triangle only, and placed the pointed side into the corner of the cover underneath the hem. (I made two of these, one for each corner).
Fold over once, and place boning in the top/center of the fabric (I folded the fabric in half to know where the center was). Sew along the top part of the boning. Now fold the fabric over again, but do not sew it up yet.
Place strap right next to the boning. Put raw edges underneath the fold, and flip the strap up before sewing it in place.
Place the longer stap on the other side of the boning,and do the same thing as the other side. Once straps are pinned in place, sew along the bottom. Finish sewing all the hemmed edges closed.
Here is the finished pocket all sewn in.The finished product.

Tuesday, April 13, 2010

Men's Shirt Refashion - Skirt

I saw this on someone's blog (I can't remember who's...sorry), and thought it was a really cute idea. So here is my version of a men's shirt turned into a toddler skirt.
The finished skirt
(probably ended up being more like a 3T/4T skirt)
Start with a men's dress shirt (this was size L)
Cut right below the arms, and even out the bottom. Remove the pocket and any buttons that might get in the way of sewing. The middle piece will be the skirt. I did not cut the sides to make it smaller...just used the elastic to sinch it up small enough. I also cut another inch off the bottom before heming it up.
For the top waistband, fold over once and then again leaving a space big enough for the elastic to fit in. Sew it closed. Remember to leave an opening for the elastic to go through.
I put a 21 inch piece of 3/4inch elastic through the waistband.
Pull both ends of the elastic and sew together. Then sew the open hole closed.
Do the same thing (minus the opening/elastic) for the bottom hem.
The Front
The Back.

Friday, April 9, 2010

Finally Finished...

I've had a few projects that needed to be finished, so I finally got around to it today. Here are a few that I finished.

Another variation of the ruffle-bum onsie with matching felt flower/headband.
A binky Clip
And another blanket done just like the one from my previous post.
A close-up on the fun stitch I decided to use this time.

Baby Legs (Attempted)...

My friend has been busy making these lately, and I thought I would give it a try. I didn't have the right type of socks (too small/thick), but I at least learned how to make them. Once I get to the store, I'll try again. I followed this simple tutorial from Little Birdie's Nest.
Start with your socks.
Cut the toe and heel off.
Fold the foot part of the sock in half. Wrong sides together.
Attach the folded portion of the sock to the bottom of the top part of the sock. Raw edges together. (hope that made sense). Right sides together.
Sew three layers together (notice the grippers on these socks, they caused a lot of grief when I sewing them up). Use a longer stitch length to avoid stretching the sock.
Finished.
Notice how the sock looks stretched? It's because the grippers were getting stuck under the foot, and I had to pull the socks through.
They ended up a bit short, and too stretched out at the bottom.

Wednesday, April 7, 2010

Flannel Swaddle Blanket...

I had the opportunity to go to M&L Discount Fabric Store this weekend (If you live in Southern California...you MUST go! I've had a couple friends recommend it, and why I waited so long to go I'll never know). It was very theraputic after a LONG week of potty training. I found some great flannel prints, and decided to make some receiving blankets inspired by the ever so popular Swaddle Blankets. It was my favorite blanket with my first, so I was hoping to make a few of my own for a fraction of the cost.

Materials:
1 yard of flannel
Matching Thread
I traced a large dinner plate to get the rounded corners.
Cut on the line.
After it's been cut. I took a lot of time ironing, folding and pinning it into place. I folded it over once about a 1/4 inch, ironed, folded it over again, ironed and pinned into place.
I used a decorative stitch to sew it up. I think it added a fun touch to the blanket.
The finished blanket folded and sewn!

Friday, April 2, 2010

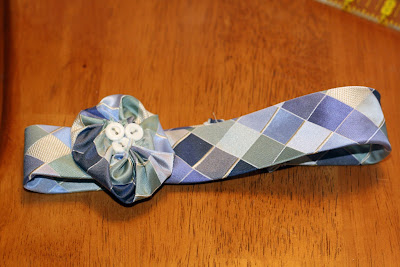
Tie Headband...

Before your husband throws away those old ties of his you have to try this 20 minute craft from Craft Envy. It really only took 20 minutes, and was such a clever way to make a headband.
Cut skinny part of tie.

Add Elastic (Mine ended up being too short).

Attach it to the other side.

Add a flower embelishment from the larger side of the tie.
Mine ended up being too small for my daughter, so I have to re-do the elastic on it.

Thursday, April 1, 2010

Maternity Shirt Re-Fashion

Luvinthemommyhood had a great maternity tutorial post that inspired me to re-fashion one of my shirts. The tutorial comes from Homemade by Jill. I have this very ill-fitting shirt my husband bought me at the end of my last pregnancy. It fit much better then (I was HUGE), but ever since has just been too big. I decided to give it a try.
Unflattering shirt (and picture of myself)

Side shot.
There really isn't much shape, and it makes me look bigger.
The shirt before

Take elastic and zig-zag stitch it to the side seam of shirt.
The tighter you pull the elastic the more it will bunch up.

Finished! I will be re-doing this shirt as I ran out of pink thread and the white thread i used on the other side is showing through (my tension was off). BUT you can get the idea of how doing that added a little more shape to the shirt.
P.S. here I am a little over 32 weeks.